This is the question asked by many new wordpress users those who are started learning themselves installing it on local Server (localhost). Changing from Localhost to a live server is not so tough as you think. It’s so easy and I’m going to explain here step by step!
Step 1:
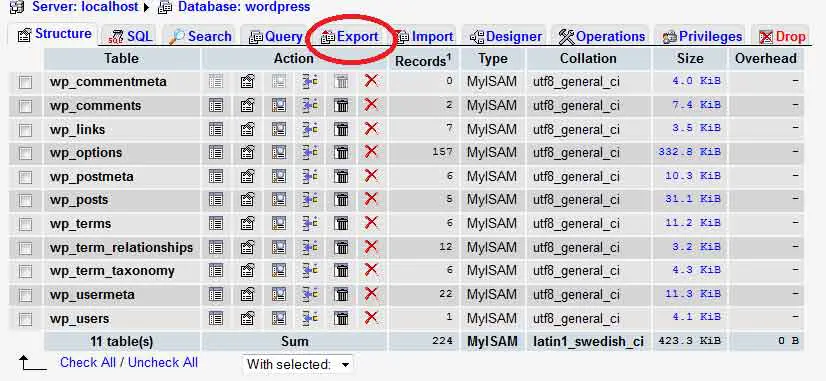
The first thing you need to do is take a backup of your Worpress Database by Exporting it!. I will show you how to export the database from PhpMyAdmin
See the above picture it shows all the tables in the wordpress database. See the red mark circled on the picture. Click the Link!
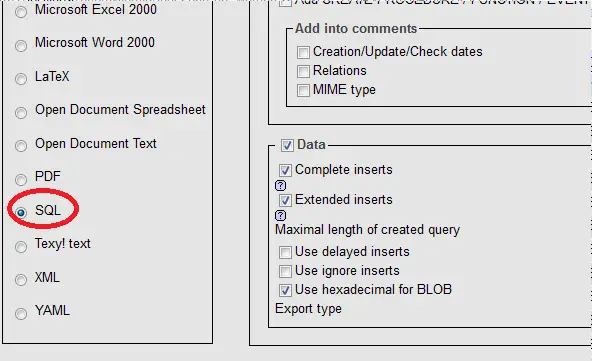
After you click the “Export” Link you will come to this page. Just Select the option as “SQL” and Click Go button!. After you click the button a popup will come and ask you to download the SQL file. Just download the file on your computer.
Step 2:
After finish downloading open the file with a good text Editor. I’m using Notepad++. Here we are going to replace the url https://localhost/mywordpress to https://yoururl.com
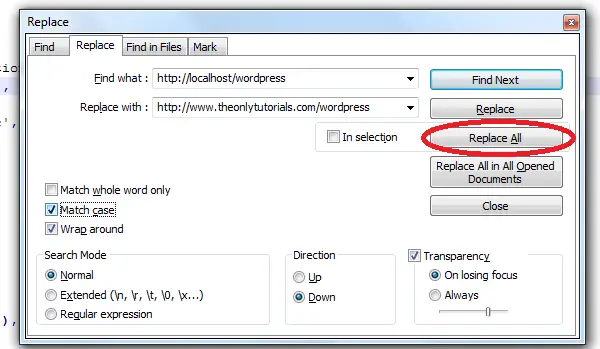
In Notepad++ there is option called find and replace. I’m gonna use that option to replace all the https://locahost occurrence in the Downloaded WordPress SQL File. See the picture below to know more!
NOTE: Make sure before you replace If you’re going to use wordpress in the Root Folder of your Live Server. You need to replace with https://www.sitename.com otherwise, For instance if you are going to use wordpress in a sub-folder (root/wordpress) include that url eg., https://www.sitename.com/wordpress.
The above picture shows how to replace the localhost url to the your site url. Just press CTRL + F and select the tab Replace and type the url to replace!. It will replace almost 210 URLs. (Not Exactly)
After you successfully replace the URLs just save the file. The next thing you need to do is uploading this database to the live server!
Step – 3:
Open the PhpMyAdmin from your Live Server and create a database then click the “import” link to upload the database on the server.
Upload the modified SQL File here by clicking the “Browse” Button. Almost done!. The next step is to upload the wordpress files on the server!
Step – 4:
Just use any FTP Client to upload the files on your Live Server. Make sure you are going to use wordpress in the root folder or sub folder.
After you upload the Files on the Live Server. Open up a file called “wp-config.php” and change the below database configurations according to your Live Server.
define('DB_NAME', 'wordpress');

/** MySQL database username */
define('DB_USER', 'root');

/** MySQL database password */
define('DB_PASSWORD', '');

/** MySQL hostname */
define('DB_HOST', 'localhost');

/** Database Charset to use in creating database tables. */
define('DB_CHARSET', 'utf8');

/** The Database Collate type. Don't change this if in doubt. */
define('DB_COLLATE', '');
Line 1 : Change this into your present Live Server Database Name.
Line 4 & 7: Change these into your present database username and password.
Line 10: Most of the time this will be ‘localhost’ only but some server will have their own name, so you may need to change this also according to your Live SQL Server Hostname.
All is done. Just open your site and Enjoy seeing your WordPress website on a Live Server.


